Thursday, July 1, 2010

Green Tea Brulee


Ingredients

Fresh Cream 250 ml
Fresh Milk 60 ml
Egg yolk 3
Sugar 35 gm
Honey 5 gm (1 teaspoon)
Green Tea Powder 3 gm (1 tablespoon)
Hot water 1 tablespoon

Method

1. Mix green tea powder with hot water and make a paste.
2. Put fresh cream and milk in a pan and warm it to 50 degrees C. Do not bring to boil.
3. In a bowl, put egg yolk, sugar, honey and green tea paste and mix well.
4. Add the egg mixture into the cream and milk pan and mix well.
5. Strain the mixture into souffle cups and bake (using bath bake method) for 15 minutes in oven temperature 150 degrees.
6. Cool in a refrigerator and leave to set.

Monday, June 7, 2010

Macarons


I never grew up knowing macarons. Mother never made or buy them. Its only after I have started working and could enjoy high tea with friends at the hotel, I knew of the existence of macarons and always loved them especially if it comes on the cakes.
I was so happy and fortunate that I got to learn to make this myself plus the kids like it too. Its quite expensive to buy it from the store if I want to buy a lot for a party, it leaves a dent on my pocket...hahahahaha.

Macarons

Ingredients

For meringue
90 gm egg white
90 gm granulated sugar
90 gm icing sugar
105 gm almond powder (almond meal)
Few drops of red colouring

For Filling

60gm fresh cream
150gm white chocolate
1 1/2 teaspoon strawberry powder or 1/3 teaspoon strawberry essence


Method:

1. Sieve icing sugar and almond powder in a bowl. Do this twice.
2. Beat egg white till foamy and add half sugar and beat till soft peaks form.
3. Add the balance of sugar and continue to beat until stiff.
4. Fold in the sieved sugar and almond powder to the egg mixture and mix well.
5. Add the red colouring and fold the mixture gently until combine.
6. Put dough in a piping bag with a 2 cm plain tube. Pipe a 4 cm round and 2cm apart onto a baking tray that have been lined with greased paper.
7. Tap the tray gently so that the mixture spread nicely and leave it to stand for 20 minutes or longer until it becomes dry and when you touch them it will not dirty your finger.
8. Bake in a preheated oven 140C for 15-20 minutes. Let it cool on the baking tray.


For filling:-

1. In a saucepan heat the fresh cream until boil and remove from heat. Add the chopped white chocolate. Stir until smooth. Add the strawberry flavouring.
2. Keep the mixture in the refrigerator until cool or until mixture is spreadable.
3. Put mixture in a piping bag and pipe it onto the macarons and sandwich them.

Note: you can divide the meringue mixture into 3 parts and add colouring as you like. Do the same for the filling and just add other flavouring i.e. mango, lemon, coffee or simply plain. You will definitely enjoy the arrays of coloured macarons on the table as I did.
You can also sprinkle cocoa powder, instant coffee, chopped chocolate on the meringue mixture after piping them to give your meringue a more appealing look or just leave it plain.

Saturday, May 22, 2010

Chocolate Cupcake


It was a day off from school for the kids last Thursday. My initial plan was to take them to Disneyland but weather forecast doesnt look good showing sign of scattered thunderstorm and it was raining the morning bit. Felt sorry for the kids as later part it turn out to be such a beautiful day and it would have been lovely to spend the day outdoor. Since there was a changed in plan, I called one of their friends to invite her over but sad she has got lessons to attend. Sigh........what next?? Kids were getting restless and bored and to make it worst, I decided to cook Malay Dish for lunch that day.......hahahahaha once in a while they have to follow my taste bud as well. Of course, when I mentioned its going to be Asam Pedas Ikan (Fish in Spicy Sour Soup) they gave me that boring look...but I'm determined this time, they have to eat whats on the table... (do I sound like a step mother...hahahaha) At the end was so happy to see them enjoying the dish and they said "hmmm will have this dish again". Yes, mission accomplished...lols!!

To keep my princesses entertained, I agreed to make cupcakes for them as a treat that day for tea time and thus we got invitation to have dinner at a friend's later. It would be nice to bring something too. There we go....baking time again and all of us had fun baking together and messing up the kitchen.

Here's the recipe:-

150 gm butter
300 gm castor sugar
3 eggs
350 gm plain flour
1 teaspoon bicarbonate soda
1/2 teaspoon salt
340 gm cooking chocolate or chocolate chips
350 ml water
2 teaspoon vanilla essence

Method:

1. Sieve flour, bicarbonate soda and salt together into a bowl and set aside.
2. Using double boil method, melt butter and cooking chocolate until chocolate completely melted. (you can also put in the microwave).
3. Pour the melted mixture and add sugar. Beat until well blended.
4. Add egg one at a time.
5. Add the vanilla essence.
6. Take 1/3 of the sieved flour and fold into mixture. Repeat until finish.
7. Add 1/3 of the water into flour mixture and mix until smooth. Repeat until finish.
8. Pour mixture into cup cakes mould and bake in a preheated oven 170C for 20 minutes or until cake tester inserted comes out clean.
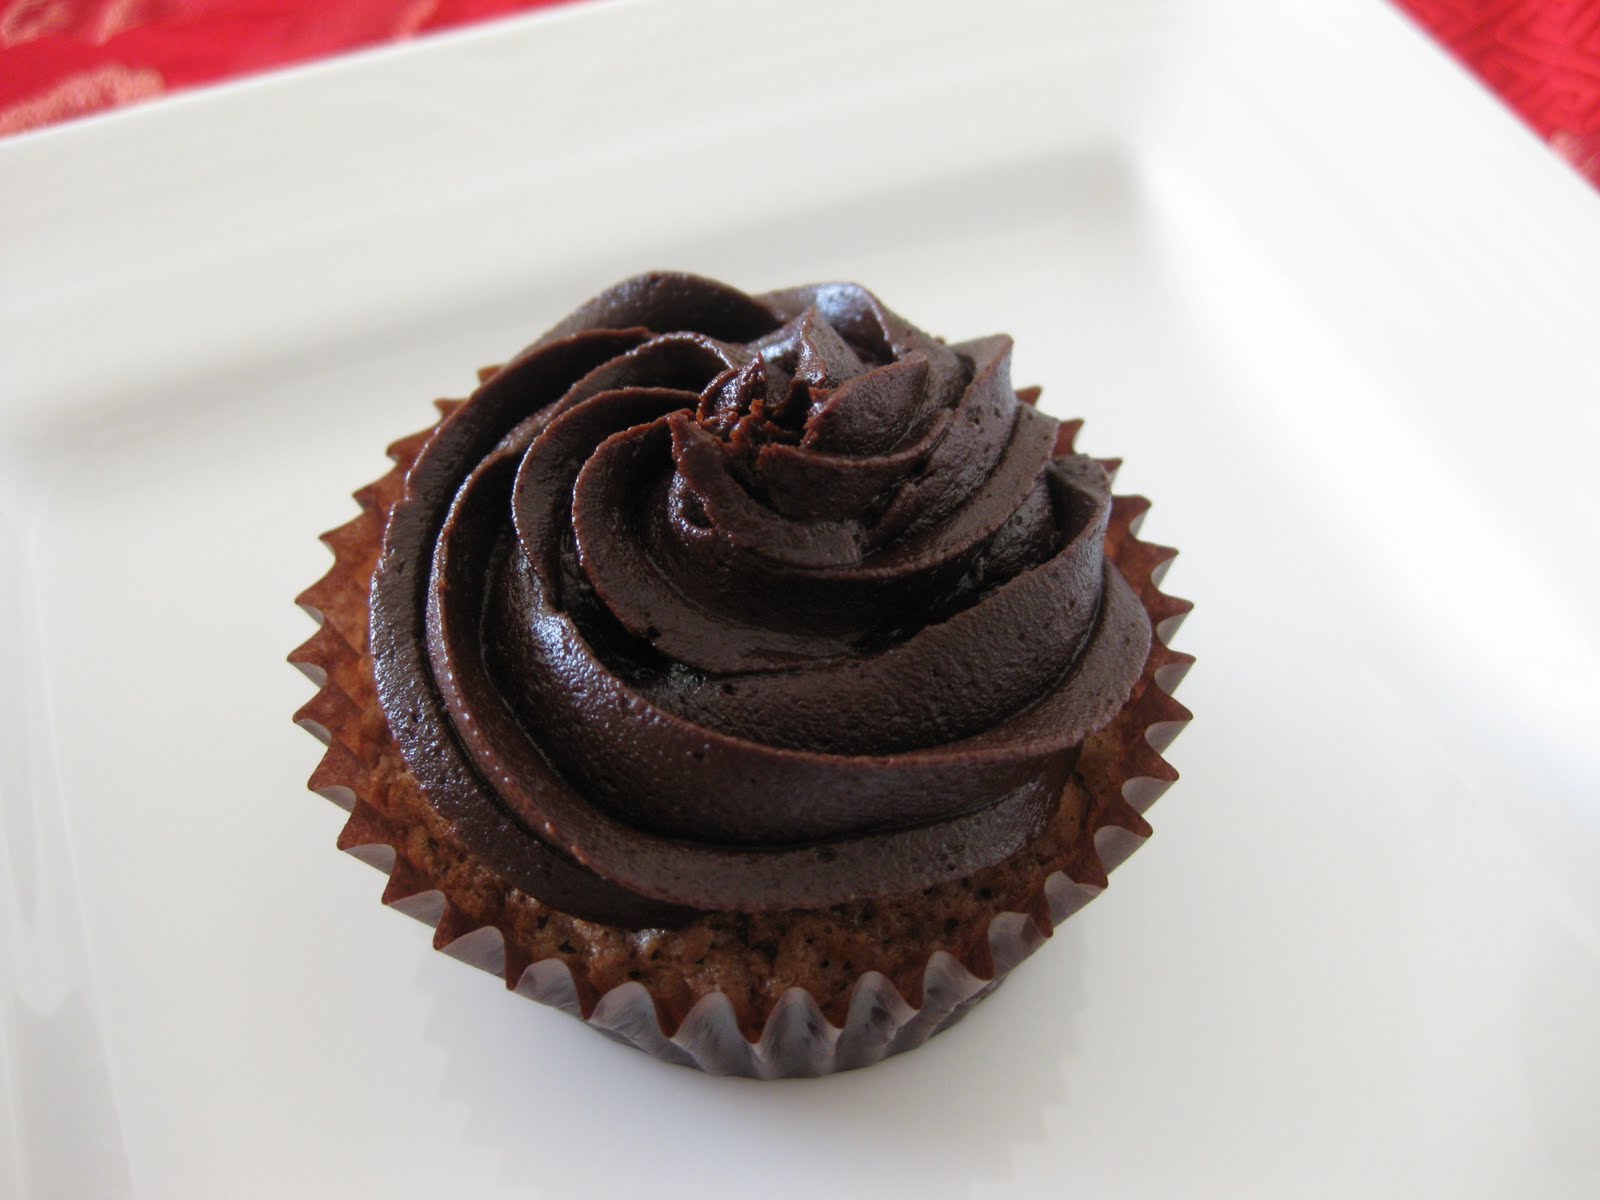
9. Let cool and spread with Chocolate Butter Cream Icing.


Chocolate Butter Cream Icing

Ingredients

200 gm butter
3 cups icing sugar
1/2 cup cocoa powder
1 teaspoon vanilla essence
3 tablespoon milk

Method:

1. Cream butter till smooth.
2. Add icing sugar and beat well.
3. Add vanilla essence, milk and mix.
4. Add cocoa powder and beat until well blended.
5. Put in a piping bag and pipe it onto the cake or spread it with spatula and add sprinkles.

I used Valrhona Cocoa Powder this time and it does give that smooth chocolaty taste....luv it!!

Happy Baking!!

Tuesday, May 18, 2010

Sugee Cake


This is one of my favorite cake. I was very lucky as my ex boss's wife used to make them for me as she knows I really love them. I used to order this cake from a lady in KL or buy them from a cake shop in Bangsar. Never once I tried baking them. I dont know where this recipe came from but I believe it must be from my ex boss's wife as it was written on a piece of paper and I had them for years.

Since I have to bake a cake for my finale lesson at Wilton, i thot of giving this one a try. The original recipe makes a bigger cake and since I dont have a big mould, I have to make a smaller one and halved off all the ingredients.

Ingredients:-

(A)
125 gm butter
130 gm suji (semolina)

(B)
125 gm butter
160 gm sugar

6 egg yolks
4 egg whites
40 gm castor sugar
1 tsp vanilla essence
100 gm plain flour }
1 gm baking powder } sieve together
65 gm ground almonds }

Method:

1. Line a 8 inch round cake tin with greased baking paper.
2. Beat butter (A) till light and fluffy. Add the semolina and mix well. Leave the mixture to stand for 30 minutes or longer.
3. Cream butter and sugar till light and fluffy.
4. Add yolk one at a time and mix well.
5. Add the essence vanilla and add the suji mixture and mix until everything combines.
6. Beat egg whites till foamy and add sugar. Beat till stiff.
7. Fold the egg white mixture to suji mixture.
8. Add the sieved flour, baking powder and ground almonds to the suji mixture. Fold gently until combine.
9. Bake in a preheated oven 170C and bake for 55 minutes.


The verdict from a friend and my better half..........lovely!! Happy trying and leave a comment.

Saturday, May 15, 2010

Raisins/Orange Peel Cake


I recently signed up to do a Fondant and Gum Paste course here. I finished my Course 1, 2 and 3 in the Land of the Rising Sun. Since this is the final course offered by Wilton, I thought I might as well do it and be done since I love spending time baking and also to perfect my decorating skills. Didnt realise that the arrangements and things provided by the school differs from each country. In Nippon we were provided with the real cakes or the dummy cakes but here we have to bring our own.
With a very short notice to prepare for my 2nd lesson which falls on the next day, I didnt want to let my disappointment dampened my learning spirits. Wanted to try making sugee cake but sad that I dont have the ingredients in my kitchen and it was too late to rush to the supermarket. Wanted to make dark chocolate cake...didnt have cocoa powder at home....sigh.
What I found in stock was some raisins and orange peel. I actually bought the dried orange peel to make my orange bread. What am I to make.....aaarghhhhhhhh. Lucky, mother taught me how to make steam mix fruit cake before. I used the same method accept no mix fruits and orange sunquick this time.

Woke up early that day and manage to make a cake. What shall I call this ..... Steam Raisins/Orange Peel Cake?? Thank God, it turned out okay considering it was made in a haste and with whatever little ingredients I had at home. Brought my cake and was only taught to lay the fondant on it and I just topped it with the 2 carnations I made the day before during my 1st lesson. Blind me...........cant tell how disappointed I was that day!! Was expecting to be able to deco the cake better but no appropriate tools was provided. But anyway.....on the bright side, yes another cake for the family and my other half just love it.


My Raisin Cake, the original look before the covering fondant, dont know why I cant rotate this picture...

Here's the recipe

Ingredients:-
300 gm caster sugar
300 gm plain flour
3 large eggs
180 gm butter
250 gm mixed dried fruits ( i used raisins and orange peel)
1 tsp bicarbonate soda
1 tsp vanilla essence
1 cup water

Method

1. Heat pan and add 150 gram sugar and let it caramelised. Once sugar turn brown add water and let it boil until the caramelised sugar become syrup. Remove from pan and let cool.
2. In a bowl, sieve flour and add the dried fruits. Put aside.
3. Beat egg white and bicarbonate soda until foamy. Add the balance of 150 gm sugar and beat till stiff. Add yolk one at a time. Mix well.
4. In another bowl, cream butter till light and add the egg mixture mixing well.
5. Add the vanilla essence.
6. Add the flour mixture and using cutting motion mix ingredients well.
7. Last, add the sugar syrup and fold in the mixture.
8. Pour in a round 8 inch mould that has already been lined with baking paper. Cover with foil and steam for 2 hours in a preheated steamer.

Friday, April 30, 2010

Red Velvet Cuppies


I always see red velvet cupcakes sold in stores but never really feel like trying them. Its always the usual pick of vanilla or chocolate cupcakes....how boring yeah. Its a friend's request that trigger me to try and make this cuppies and at the same time wondering...what is the real taste of this red velvet as the name sounds very luxurious to me.

I actually tried baking them using the recipe that my friend forwarded but the result was a disaster and the trash bin was happy to gulp them all. Sigh........... Not wanting to give up, I tried again using a recipe I found from someone's blog. It taste not too bad but the ingredients list was just too long and it wasn't simple to make, too many steps. Still not very happy about this and since I was down town yesterday, I decided to buy the red velvet cupcakes from a reputable store here to taste theirs and to compare with my produce. You cant go wrong isn't it buying from a famous bakery to find out how the real taste should be.

Finally today, after my 3rd attempt, I was very pleased with the outcome. My little testers at home said to me that it tasted better than the ones I bought yesterday........Kids are innocent alright so I am sure their comments are true...hahahahahaha

Got this recipe from Wilton

Ingredients:

2 1/2 cups all-purpose flour
2 tablespoons cocoa powder
1 teaspoon salt
1 1/2 teaspoons baking powder
1/2 cup (1 stick) butter or margarine softened
1 1/2 cups granulated sugar
2 eggs
1 1/2 teaspoons Red (no-taste) Icing Color
1 teaspoon clear vanilla extract
1 cup buttermilk
2 tablespoons water
1 1/2 teaspoons white vinegar
1 teaspoon baking soda

instructions
Preheat oven to 350°F. Line standard muffin pan with baking cups. In medium bowl, combine flour, cocoa, baking powder and salt; set aside. In large bowl, cream butter and sugar with electric mixer until light and fluffy. Add eggs, icing color and vanilla extract; mix well until icing color is well incorporated (scraping down sides of bowl when necessary). Alternately add flour mixture and buttermilk to butter mixture; add water and mix well. In small bowl, combine white vinegar and baking soda; gently stir into cupcake mixture. Spoon into baking cups. Bake 20-22 minutes or until toothpick inserted comes out clean. Cool cupcakes in pan on cooling rack for 5-8 minutes. Remove cupcakes from pan; cool completely

For the Cream Cheese Topping, here's what I used:-

Cream Cheese Topping

250 gram Philadelphia cream cheese
100 gram unsalted butter
1 1/2 cups icing sugar
1 teaspoon vanilla essence

Instructions:

Beat cream cheese and butter till light and fluffy. Add the vanilla essence and mix well.
Add the icing sugar and beat well. Spread on your cake.

Wednesday, April 21, 2010

Humidity in Hong Kong

Ever since I arrived this vibrant city with 7 million population, the most notable differences here is the humidity. Nothing ever gets dry when they’re hung on a line. Even though it’s 22°C outside, it feels more like 15°C because it’s so damp. Humidity is something that Hong Kong is known for as it is surrounded by water and filled with tall buildings. It makes me wonder how people deal with mold in their houses. Its wet everywhere. Been home most of the time and yet feel so sticky...cant imagine if I were to be out on a hot day. Not even 3 months staying here the wall in my bedroom is already moldy.....??? Of course, the solution is to get a dehumidifier to help absorb the water and thus help guard your precious things in the house...otherwise not only the books will get wrinkly...my skin will need a lot of La Mer cream to prevent from wrinkling too....lols!! The weather is so bad so much so dehumidifier is currently out of stock. The shop assistant ask me to come back at the end of this month when their new stock arrive.

This is really classic and just cant help but to share this with you guys. One day somebody almost slipped at the corridor of my house as the floor was really wet and slippery, to me it doesnt show a good sign. Having children it just creeps me out to see those bloody wet floor. Everyday I pray that everyone will be alright and had to exercise my vocal reminding the kids to be careful when walking. Since the wall is moldy too, I decided to call the maintenance guys for them to come have a look and at the same time hoping that they will rectify the problem. Ding Dong.......

Mr H : Good morning Madam, I come to see the wall and to check about your complaint of the wet floor.....
Me: Oh thank you for coming Mr H, (took him to the room and showed him the wall - he took some pictures of the wall)
Mr H : Oh okay madam, I will show this picture to my office and we will get the contractor to come and clean the wall for you.
Me: Em Koi...let me know when you want to come and fix the wall and another thing Mr H. Can you see... the floor is very wet and it is so slippery. Maybe you all should put a dehumidifer here too. It is very dangerous la I think.
Mr H: Oh Okay Madam, I will report to my office and we will fix the problem. You dont worry la.
Me: haiya, haiya and thank you so much Mr H.

DENG...DENG....DENG........ few days later...........this is what I saw on the wall................just cant help but to laugh.
I saw the warning sign hanged up. I believe this will help make the floor dry...........

this is what I mean...the floor is really wet.

the next day, even the warning sign slipped off from the wall.........hahahahahahaha

Sunday, April 18, 2010

Onion Cheese Quiche


Its depressing when the cakes you bake or the sweets you always prepare for the children doesnt appeal to them anymore. I guess they must be bored with the same stuff mummy makes. Enough of sweet desserts I believe, so I decided to make savoury tart for tea one afternoon. It was worth the effort and it was really nice to see them eat and fighting for more. Just finished baking onion cheese quiche again so they could bring to school for their lunch tomorrow. Safe me the hassle of preparing their lunch box in the morning.


Here's the recipe:-

Ingredients:

(For filling)
25gm butter
1 large bombay onion
3 large eggs
50ml cream
150ml milk
70 gm turkey bacon or beef salami (cut into small pieces)
1/4 teaspoon nutmeg
100 gm grated cheese
salt and pepper to taste
1/4 cup chopped parsley

(For Pastry)
200 gm plain flour
100gm butter
1/2 teaspoon salt
4 tablespoon cold water


Method:

To make pastry

1. Mix flour and salt in a bowl. Rub the butter into the flour until it becomes breadcrumbs. Add water and mix to a firm dough. Add more water if required. Knead until it become a smooth dough.
2. Wrap dough in plastic wrap and chill for 20 minutes.
3. Roll dough on lightly floured surface and use a 23 cm pie tin (loose based pan).
4. Press the pastry firmly to the sides and base of tin. Use a fork to prick the pastry all over. Use a rolling pin to trim the excess pastry.
5. Cover with aluminium foil and put in the freezer for 15 mins.
6. Preheat oven to 200c and blind bake the tart for 15 minutes. Remove the blind beans and foil and continue to bake for another 5 minutes.
7. Remove the tart from the oven and reduce the temperature to 180C.
8. Spread the onion mixture, sprinkle with shredded cheese and pour the milk mixture and bake for 35 minutes or until the filling set.
9. Let cool before removing from the pie tin. Sprinkle with chopped parsley before serving.

To make the filling:-

1. Heat butter in a pan and saute the onion until the onion become soft, add the turkey bacon and saute for a couple minutes more. Remove from fire and let cool.
2. Beat the eggs, cream and milk in a bowl. Add the nutmeg and season to taste with salt and pepper.

Note: You can omit the turkey bacon or beef salami to make a vegetarian quiche. I have tried putting cod fish into the mixture and it taste equally good too. Its up to your own creativity and personal taste....happy trying!!

Monday, April 12, 2010

It's been awhile............

Hello my readers

It has been awhile since my last posting. Not for anything but too occupied with home front. I believe moving always take its toll on anyone. Well, glad that I am back to my normal routine and things are falling nicely into its places. I do miss my life in Nippon (thats history for me) but at the same time I thank God for allowing me the opportunity to discover a new place. It will be a good experience for the family and me especially the children. Thanks to my other half whom has been working so hard for the family thus enabling us to experience new place, people, culture and language.

Slightly over 3 months now and I am very much settle and at my best state in this new environment. The kids are happy with their new school, I have made some new friends and a handful for now to keep my social life abuzz, started my baking business again by chance (special thanks to a friend..you know who you are), I know my whereabouts a little and of course I hope to be able to explore every inch of this Island that I call home for the timebeing.

Its quite easy to live here and there is influx of supply for anything that crosses your mind as long as you have enough lollies in your purse ~ no worries mate. Plenty of choices to suit your budget. Though a person may not speak Cantonese but one can easily get around and adapt to living in this vibrant city called Hong Kong.

At the beach, Park Island for the first time

A view from The Peak during one of the walks

experiencing Yamcha, a must for anyone

Sunday, February 28, 2010

Happy Birthday Mother


Today mark Mak's 67th Birthday. Safe...my grandma gave birth to her on the 28th of February not 29th..lols! Regret that I couldnt be home to celebrate this special day of hers. It has been many years since I last celebrated her birthday. Sad, could only afford a phone call to wish her. Having a family of my own robbed me from being with her. Insyaallah, if God permits, I want to celebrate your next birthday together.
Mak, I wish you a very happy birthday and many more to come. May Allah continue to shower you with his utmost blessings. Amin. I know I have not been a daughter you wanted me to be and we always differ in thinking and in a lot of ways. One thing for sure, I take my hats off you for you are such a strong woman that I have ever met in this world and I envy your sense of determination. Nothing can stop you Mak. I hope I do inherit those trade mark of yours.
I miss you Mak and I hope you had a wonderful day today. I love you Mother.

Luv Always
Your daughter.

Tuesday, January 5, 2010

HAPPY NEW YEAR 2010

Its 5 days into 2010 and next I know it will be another countdown to welcome another new year. I had a very quite new year as we had just arrived a couple of days before we say farewell to 2009. This year marks another important chapter in our lives as there's great changes for the family. Moving to a new country and adjusting to new place and environment is a challenged I must say and especially after staying in one place for a period of 6 years. I would be lying if I say I dont miss my old place but the truth is the people I found there, that makes my life and my stay so comfortable and so much fun. I must thank god for my lucky star to have a life so blessed and to have met a bunch of wonderful friends.

Alhamdulillah, the kids are happy and seems to be adjusting very well at our new place considering we have been here only for 9 days. They started their first day at school yesterday and have already been busy making new friends and were so excited about their new school. That' a good sign!! Kids are happy.


upon arrival at the airport.

Yes, 2010 come what may....I am all set for you!!